Links
IT in context
Draw
Draw programs are object based, where an object is a geometrical shape such as a line, a circle, a curve, a rectangle or a polygon (a many-sided figure). These are sometimes also called vectors.
1.
First look at the menu of shapes which your Draw based program gives you.
There should be a pallette or a menu with small pictures of the shapes
you can draw.
Try drawing simple shapes with each tool. Normally you need to click once on the tool of your choice, click once on your new page and hold the mouse down until you have drawn the shape.
When you have released the mouse button you will need to re-select the shape you have drawn before changing the shape or moving the object.
When you select the object you will see small squares or "hooks" at the edges and corners of the object. By clicking in these "hooks" you can stretch, move or rotate the object.
2. Draw a square (choose the rectangle tool from the menu), select it so you can see its "hooks" then stretch it until it is a long rectangle. Now either click on and drag each of the corner hooks until you find one which will rotate the rectangle or choose the "rotate" menu and drag one of the "hooks" until you can rotate the rectangle. Rotate it until it is tall and thin instead of long and thin.
3. Now draw a polygon. You should be able to choose how many sides your shape should have, possibly by placing the number in a small box on the menu.
Try stretching and rotating the polygon. Then place the polygon over the rectangle. Try to select the rectangle. Although one shape covers the other you will probably be able to see both. Practise selecting first one shape and then the other, imagining they are in layers, one in front of the other.
4. Look for a menu which allows you to move one shape forward or back. By moving the layers forwards and backwards you can build up a sandwich of layers, allowing you to draw a background and place objects on top.
5. Try drawing a salad sandwich. First draw a rectangle - this will be your piece of bread. Now copy it and paste the copy on your page alongside the other piece of bread. Now add a tomato - a circle using the circle tool. Note that you may have to hold down the SHIFT key to make an ellipse into a true circle. Fill this with a red colour. Now add other pieces of salad. A polygon filled with green could be your lettuce, a sliced egg can be made from a white circle with a yellow circle on top. Finally add the second piece of bread. You should be able to "fill" the shape with a texture. Choose a texture with small dots to make the rectangle look like bread.
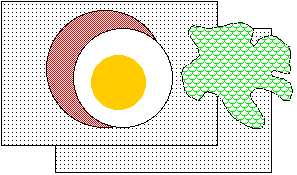
To see the contents of the sandwich you can send the top layer to the back and the next layer will show. Select each layer in turn, then move it to the back. You can place the layers in a different order (lettuce behind egg, egg behind tomato) by selecting the layer and moving it back or forwards.
6. Save your sandwich and you can place it as part of a larger picture or an article in a magazine about sandwiches.